
Let’s write a Spark Streaming example in Scala which streams from Slack. This tutorial will show how to write, configure and execute the code, first. Then, the source code will be examined in detail. If you don’t have a Slack team, you can set one up for free. Let’s cover that too. Sound fun? Let’s do it.
Before we begin, this Spark Streaming tutorial assumes some familiarity with Spark Streaming. For a getting started tutorial see Spark Streaming with Scala Example or see the Spark Streaming tutorials.
Let’s start with a big picture overview of the steps we will take.
Table of Contents
- Spark Streaming Example Overview
- 1. Setup Spark Streaming Development Environment for Scala and SBT
- 2. Write Scala Code
- 3. Configure Slack for API access
- 4. Start Apache Spark in Standalone mode
- 5. Run the Spark Streaming app
- 6. Revisit Spark Streaming Code – Describe Key Concepts
- Spark Streaming Example Conclusion
- Resources for this Spark Streaming Example Tutorial
Spark Streaming Example Overview
- Setup development environment for Scala and SBT
- Write code
- Configure Slack for stream access
- Start Apache Spark in Standalone mode
- Run the Spark Streaming app
- Revisit code to describe the fundamental concepts.
So, our initial target is running code. Then, we’ll examine the source code in detail.
1. Setup Spark Streaming Development Environment for Scala and SBT
Let’s follow SBT directory conventions. Create a new directory to start. I’m going to call mine spark-streaming-example. The following are commands to create the directory, but you can use a window manager if you wish as well. If this directory structure doesn’t make sense to you or you haven’t compiled Scala code with SBT before, this post is probably isn’t the best for you. Sorry, I had to write that. I don’t mean it as a personal shot against you. I’m sure you are a wonderful and interesting person. This post isn’t super advanced, but I just want to be upfront and honest with you. It’s better for both of us in the long run.
Anyhow, where were we? oh yeah, directory structure.
mkdir spark-streaming-example
cd spark-streaming-example
mkdir src
mkdir src/main
mkdir src/main/scala
mkdir src/main/scala/com
mkdir src/main/scala/com/supergloo
Next, create a build.sbt file in the root of your dev directory. Ready for a surprise? Surprise! My build.sbt will be in the spark-streaming-example/ directory.
The build.sbt I’m using is:
name := "spark-streaming-example"

version := "1.0"

scalaVersion := "2.11.8"

resolvers += "jitpack" at "https://jitpack.io"

libraryDependencies ++= Seq("org.apache.spark" % "spark-streaming_2.11" % "1.6.1",

  "org.scalaj" %% "scalaj-http" % "2.2.1",
  "org.jfarcand" % "wcs" % "1.5")
You see what’s happening, right? I said, RIGHT! Hope you didn’t jump out of your chair there. I wasn’t yelling, but just want to make sure you’re still with me.
In a nutshell: I’m going to use Scala 2.11.8 and grab a few dependencies such as Spark Streaming 2.11, Scalaj-http and WCS. There are links to these are more descriptions later on this post. In short, we need `wcs` to make a websocket connection to slack and `scalaj-http` is for a http client. Remember, our first goal is working code and then we’ll come back to more detailed descriptions. Stay with me.
2. Write Scala Code
I called this step “write Scala code”, but the more I think about it, this isn’t entirely accurate. In fact, I’m going to write the code and you can copy-and-paste. Lucky you. But, feel free to type it if you want. You’ll probably remember it more that way.
You need two files:
In the src/main/scala/com/supergloo directory, a file called SlackReceiver.scala with following contents:
package com.supergloo

import org.apache.spark.Logging
import org.apache.spark.storage.StorageLevel
import org.apache.spark.streaming.receiver.Receiver
import org.jfarcand.wcs.{TextListener, WebSocket}

import scala.util.parsing.json.JSON
import scalaj.http.Http

/**
* Spark Streaming Example Slack Receiver from Slack
*/
class SlackReceiver(token: String) extends Receiver[String](StorageLevel.MEMORY_ONLY) with Runnable with Logging {

  private val slackUrl = "https://slack.com/api/rtm.start"

  @transient
  private var thread: Thread = _

  override def onStart(): Unit = {
     thread = new Thread(this)
     thread.start()
  }

  override def onStop(): Unit = {
     thread.interrupt()
  }

  override def run(): Unit = {
     receive()
   }

  private def receive(): Unit = {
     val webSocket = WebSocket().open(webSocketUrl())
     webSocket.listener(new TextListener {
       override def onMessage(message: String) {
         store(message)
       }
     })
  }

  private def webSocketUrl(): String = {
    val response = Http(slackUrl).param("token", token).asString.body
    JSON.parseFull(response).get.asInstanceOf[Map[String, Any]].get("url").get.toString
  }

}
And you’ll need another file in the same directory called SlackStreamingApp.scala with following contents:
package com.supergloo

import org.apache.spark.SparkConf
import org.apache.spark.streaming.{Seconds, StreamingContext}

/**
  * Spark Streaming Example App
  */
object SlackStreamingApp {

  def main(args: Array[String]) {
    val conf = new SparkConf().setMaster(args(0)).setAppName("SlackStreaming")
    val ssc = new StreamingContext(conf, Seconds(5))
    val stream = ssc.receiverStream(new SlackReceiver(args(1)))
    stream.print()
    if (args.length > 2) {
      stream.saveAsTextFiles(args(2))
    }
    ssc.start()
    ssc.awaitTermination()
  }

}
Ok, at this point, “we” are finished with code. And by “we”, I mean you.
I think it would be a good idea to make sure SBT is happy.
So, try `sbt compile`. For my environment, I’m going to run this from command-line in the spark-streaming-example folder. In the Resources section of this post, there is a link to YouTube screencast of me running this. Maybe that could be helpful for you too. I don’t know. You tell me. Actually, don’t tell me if it worked. Let me know in the page comments what didn’t work. It works on my machine. Ever hear that one before?
3. Configure Slack for API access
You need an OAuth token for API access to Slack and to run this Spark Streaming example. Luckily for us, Slack provides test tokens that do not require going through all the OAuth redirects. That token will be perfect for this example.
To get a token, go to https://api.slack.com/docs/oauth-test-tokens to list the Slack teams you have joined. Here’s what my looks like (without the blue arrow):
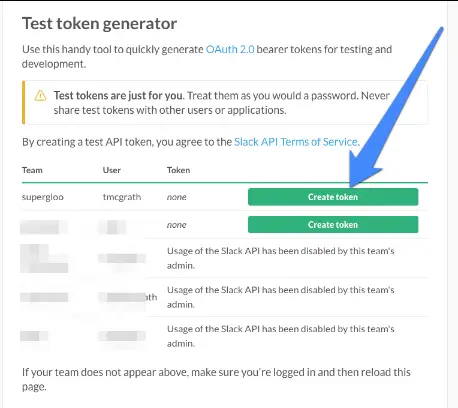
I greyed some out to protect the innocent. The point is, you should see a green box for “Create Token”. Look again at the screenshot above and where the blue arrow points. You should have this option. And if you don’t, there is another option for you.
It’s easy to set up your own, free, Slack team site. And when you do, by default, the new team setup will have API access enabled. So, create a new team if you don’t have Create Token button from any of your existing teams. Start here https://slack.com/create.
Once you have a new team set up or whenever you have a “Create Token” button available on the previously mentioned OAuth test token page, click it to generate a token. Save that token, because you will need it soon. But first, “we” need to start Spark so we can run this example. We are in this together, you and me. Here we go.
4. Start Apache Spark in Standalone mode
I presume you have an Apache Spark environment to use. If you don’t, you might be a bit ahead of yourself with a Spark Streaming tutorial like this one. If you are ahead of yourself, I like your style. Nothing like jumping into the deep end first. But, this pool might be empty and you could get hurt. I don’t mean hurt literally. It’s more mental than physical.
There are plenty of resources on this site to help get the setup running a Spark Cluster Standalone. As I said, you need that. But, let’s continue if you want.
For this Spark Streaming in Scala tutorial, I’m going to go with the most simple Spark setup possible. See Spark Streaming in Scala section for additional tutorials.
That means we’re going to run Spark in Standalone mode. You see, because I’m the author, I get to make the decisions around here. Some folks may call me a “big shot” blogger, but that really isn’t true. But, a guy can dream, right? And I actually do not dream of becoming a big shot blogger. Really, I dream of taking my kids on adventures around the world. I dream of watching movies. I sometimes dream of watching movies while my kids are someplace on the other side of the world.
Anyhow, if you are also big shot with your own Spark Cluster running, you can run this example code on that too. Your call. Evidently, you are the boss around here.
Ok, boss, start a Spark Standalone Master from command-line:
~/Development/spark-1.5.1-bin-hadoop2.4 $ sbin/start-master.sh
You should call start-master.sh or your Windows equivalent from the location appropriate for your environment. For me, that’s the spark-1.5.1-bin-hadoop2.4 directory. You knew that by looking at the example though didn’t you?
Next start a worker:
~/Development/spark-1.5.1-bin-hadoop2.4 $ sbin/start-slave.sh spark://todd-mcgraths-macbook-pro.local:7077
You do not want to add `spark://todd-mcgraths-macbook-pro.local:7077` when starting up your Spark worker. That’s mine. Leave it blank or set it to something appropriate for your machine. todd-mcgraths-macbook-pro.local is my laptop, not yours.
Ok, you should be able to tell if everything is ok with Spark startup. If not, you are definitely in trouble with this tutorial. You probably need to slow down a bit there speedy. But, you are the boss.
You may need to open another command window to run the next step.
5. Run the Spark Streaming app
Scala and Spark fan, here we go. Listen, I know sbt can be a bear sometimes. It takes some time for it to become a `simple build tool`. But, I’m not going to go over that here. Ok?
1) Start SBT in the directory where build.sbt is located.
~/Development/spark-streaming-example $ sbt
2) In your sbt console:
run local[5] <your-oauth-token> output
What you should see:
After the SlackStreamingApp starts, you will see JSON retrieved from Slack. Holy moly, let me repeat: JSON from Slack. We did it! Dora might yell Lo Hicimos! at this point. Or maybe Boots would say that. I can’t remember and don’t care. You don’t either.
Depending on your log settings, things might scroll through your console pretty fast.
You can verify by adding messages to the Slack team from OAuth token access. You’ll also be streaming messages for Slack events such as joining and leaving channels, bots, etc.
Wow, we actually did it. You and me, kid. I had confidence in you the whole time. I believed in you when no one else did. Well, honestly, not really. This is the Internet after all. But, every once and while, I’m pleasantly surprised. I still think you’re pretty neat.
6. Revisit Spark Streaming Code – Describe Key Concepts
Ok, let’s revisit the code and start with external dependencies. As briefly noted in the build.sbt section, we connected to Slack over a WebSocket. To make a WebSocket connection and parse the incoming JSON data, we used three things: an external WebSocket Scala library (wcs), an external HttpClient library(scalaj-http) and the native JSON parser in Scala. Again, links to the external libraries in use are located in Resources section below. We see all three of these in action in two SlackReceiver functions.
 private def receive(): Unit = {
    val webSocket = WebSocket().open(webSocketUrl())
    webSocket.listener(new TextListener {
      override def onMessage(message: String) {
        store(message)
      }
    })
  }

  private def webSocketUrl(): String = {
    val response = Http(slackUrl).param("token", token).asString.body
    JSON.parseFull(response).get.asInstanceOf[Map[String, Any]]
                                      .get("url").get.toString
  }
The webSocketUrl function is using the OAuth token we sent in the first argument to `run`. More on that soon. Note the parsing the incoming response data as JSON in JSON.parseFull. We sent the OAuth token from SlackStreamingApp when we initialized the SlackReceiver:
val stream = ssc.receiverStream(new SlackReceiver(args(1)))Also, we see in the `webSocketUrl` function we are expecting JSON and the schema key/value pairs of Map[String, Any].
Ok, that covers the external libraries in use. Let’s keep going.
Recall from earlier Spark Streaming tutorials on this site (links in Resources below), Spark Streaming can be thought of as a micro-batch system. Instead of waiting and processing streaming data one record at a time, Spark Streaming discretizes the streaming data into micro-batches. Or, in other words, Spark Streaming’s Receivers accept data in parallel and buffer it in the memory of Spark worker nodes.
Micro-batches poll stream sources at specified timeframes. What is the poll frequency for this example app? It’s every 5 seconds as declared in the SlackStreaming app code:
val ssc = new StreamingContext(conf, Seconds(5))And what about StreamingContext? The StreamingContext is a type of context which is specific to Spark Streaming. Surprised? Of course, you are not. You could just tell by the name StreamingContext, right? I said RIGHT!? Did you jump out of your chair that time? I hope so. You need a StreamingContext when you are building streaming apps.
Back to the SlackReceiver class now. Extending `Receiver` is what we do when building a custom receiver for Spark Streaming. And if you haven’t guessed by now, let me tell you, we built a custom receiver for Slack. Well, would you look at us? We built a custom receiver. Somebody get us a trophy. Or a ribbon. Or a ribbon trophy.
The class declaration:
class SlackReceiver(token: String) extends Receiver[String](StorageLevel.MEMORY_ONLY) with Runnable {There are a few things to note about this declaration. First, `Runnable` trait usage is for convenience to run this sample. I thought it would make things easier to run this from SBT.
We’re setting StorageLevel to memory only
StorageLevel.MEMORY_ONLYThis is the default. Nothing fancy here. This stores RDDs as deserialized objects in the JVM. If storage needs grow beyond what’s available, it will not spill to disk and will need to be recomputed each time something is needed and is not in memory. Again, we don’t need anything more in this example. Check other examples such as MEMORY_AND_DISK, MEMORY_ONLY_SER, DISK_ONLY and others if you want more info on Storage Levels. This is a Spark Streaming post, dang it.
Finally, when extending Receiver we override three functions. (Or, you might see some examples of calling `run` from within `onStart`, but we’re not going to do that here. Why? Because I’m the big shot boss and a “visionary”. On second thought, I’m a big shot visionary or BSV as they say in the business.)
Where were we?! Don’t let me get off track, partner. We need to override two functions because Receiver is an abstract class:
...
  override def onStart(): Unit = {
    thread = new Thread(this)
    thread.start()
  }

  override def onStop(): Unit = {
    thread.interrupt()
  }
...
`onStart` is spawning a new thread to receive the stream source. This triggers a call to our overridden Thread `run` function which calls the previously described `receive` function.
`onStop` is there to ensure any spawned threads are stopped when the receiver is stopped.
(Not shown, but Exceptions while receiving can be handled either by restarting the receiver with `restart` or stopped completely by `stop` See Receiver docs for more information.)
So, that’s the code. But, let’s also consider how this example was invoked. One important detail is the use of “5”:
run local[5] <your-oauth-token> output
Why 5? If we use “local” or “local[1]” as the master URL, only one thread will be used for running tasks. When using an input DStream based on a Streaming receiver, a single thread will be used to run the receiver which leaves no thread for processing the received data. So, always use “local[n]” as the master URL, where n > number of receivers to run.
When running on a Spark Cluster outside of Standalone mode, the number of cores allocated to the Spark Streaming application must be more than the number of receivers.
Finally, we’ll close with a fairly insignificant detail. The last argument is “output” which you can see from the SlackStreamingApp is used here:
    if (args.length > 2) {
      stream.saveAsTextFiles(args(2))
    }
This second argument is optional and specifies if the stream data should be saved to disk and to which directory.
Spark Streaming Example Conclusion
So, all joking aside, I hope this Spark Streaming example helps you. I like to help nice people who try. I hope you are one of those types of people.
You might enjoy signing up for the mailing list, following Twitter and subscribing on YouTube. You have options. I think the links to these sites are on the bottom of each page. To be honest, I’m not entirely sure I want you to follow or subscribe, but I don’t think I can actually prevent you from doing so. So, you’re in charge boss. See? I did it again. Just having fun.
Take care and let me know if you have any questions or suggestions for this post in the comments below.
Here is a screencast of me running through most of these steps above.
Look Ma, I’m on YouTube! You can subscribe to the supergloo YouTube channel if you want. My Ma did. I think. At least, she told me she did. (I call her Ma, not Mom, get over it. I’m from Minnesota.)
Resources for this Spark Streaming Example Tutorial
- WSC – Asynchronous WebSocket Connector – https://github.com/jfarcand/WCS
- HttpClient – https://github.com/scalaj/scalaj-http
- Check this site for “Spark Streaming Example Part 1”. This post was loosely coupled Part 2. It’s probably listed in the “Related Posts” section below.
- Spark tutorials landing page
Featured image credit: https://flic.kr/p/oMquYF
My application runs but after a few minutes it stops receiving new messages. If I stop the application and run again, it works for a few minutes, then no new messages. I’m running on a linux VM with 4 CPUs and spark in standalone mode. Is this the expected behavior? Any ideas on what might be happening?
Hi,
Can you kindly cover a similar Spark Streaming tutorial on google news or maybe bloomberg finance.
Thnx
Abhijit
And how do you decide the URL should be https://slack.com/api/rtm.start and not https://slack.com/ or https://slack.com/api