Kafka Access Control Lists (ACLs) are a way to secure your Kafka cluster by specifying which users or client applications have access to which Kafka resources (topics, clusters, etc.).
The process of authorizing or refusing access to particular resources or functions within a software application is referred to as “authorization” in software. It is the procedure of making sure a authenticated principal (a user, a system, etc.) has the privileges and permissions required to access particular data or carry out particular operations.
Kafka ACLs provide the mechanism for implementing authorization rules on an Apache Kafka cluster.
ACLs are useful in a number of scenarios, such as:
- Allow only certain users or client applications to produce or consume messages from specific topics.
- Prevent unauthorized users or client applications from creating new topics or deleting existing ones.
- Ensure that only certain users or client applications can view the list of topics or consumer groups in the cluster.
By using ACLs, you can fine-tune the access control of your Kafka cluster and ensure that only authorized users or client applications have access to the resources they need.
In this tutorial, we’ll configure Kafka ACL examples to focus on Kafka authorization.
We will build upon the previous Kafka authentication tutorial so check it out if you haven’t already.
Table of Contents
- Kafka Authorization with Kafka ACLs Overview
- Kafka ACL Example Demo
- Kafka Authorization Configuration Steps
- kafka-acls.sh Examples
- Kafka ACL for Authorization Example Source Code
Kafka Authorization with Kafka ACLs Overview
Kafka Access Control Lists (ACLs) are a way to limit which users and/or client applications have access to specific Kafka resources (topics, clusters, etc.).
ACLs are made up of two parts:
- A resource pattern specifying the Kafka resource being accessed such as a specific topic or all topics in a cluster, etc.
- An access control entry (ACE), which specifies the user or client application that is being granted access, and the type of access being granted (e.g. read, write, create, delete, etc.)
For example, you could create an ACL that allows the user “Alice” to read and write to the topic “my-topic”, like this:
Topic: my-topic
User: Alice
Operations: Read, Write
Resource patterns may use wildcards too, so you can create ACLs that apply to multiple resources at once.
For example, you could create an ACL that allows all users to read from any topic starting with “public-“, like this:
Topic: public-*
User: *
Operations: Read
Kafka ACL Example Demo
Let’s show a some examples of configuring and testing Kafka ACLs.
Again, the demo assumes you have Docker, docker-compose, Apache Kafka downloaded and unzipped, and can clone from github. It’s just an example of the key constructs, so you can replicate the demonstration exactly or, better yet, modify to fit your environment more precisely.
As usual, let me know if you have any questions or ideas to improve.
Requirements
- Docker and docker-compose
- An Apache Kafka distribution downloaded and extracted so we have access to the CLI tools in the
bin/directory such askafka-topics.sh,kafka-acls.sh, etc.
Setup Steps
- Download or clone the https://github.com/supergloo/kafka-examples/tree/master/authorization directory which includes Docker compose file and sample authentication tenant configuration filess
- From a terminal inside the directory you downloaded or cloned run
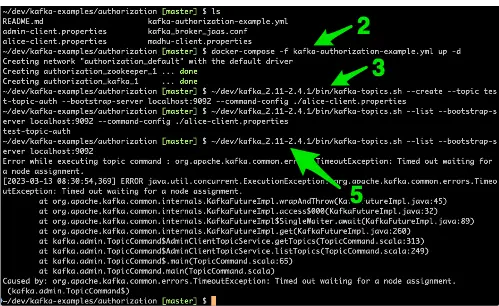
docker-compose -f kafka-authorization-example.yml up -d.See example screenshot below for example. - Create topics from
~/dev/kafka_2.11-2.4.1/bin/kafka-topics.sh --create --topic test-topic-auth --bootstrap-server localhost:9092 --command-config ./alice-client.properties. Note: The location of thekafka-topics.shscript is particular to my laptop. Adjust your path accordingly. ~/dev/kafka_2.11-2.4.1/bin/kafka-topics.sh --list --bootstrap-server localhost:9092 --command-config ./alice-client.properties~/dev/kafka_2.11-2.4.1/bin/kafka-topics.sh --list --bootstrap-server localhost:9092

So what are we showing and doing in this example?
There a few key takeaways here. The first and obvious one is to ensure everything is running smoothly.
We do this by starting up the docker containers and confirming we can create a topic when passing in a pre-configured authenticated user.
Note: this is an authenticated user and authorized user yet. We will cover the why and how alice principal was authorized to create a topic later in this tutorial.
In this tutorial, we are focused on authorization and we are starting with a setup above of pre-configured authorized users.
We will be using these authorized users as we progress further in the authorization tutorial below.
If you need a refresher on authentication (vs. authorization), check out the Kafka Authentication Tutorial.
Ok, back to this Kafka authorization tutorial setup.
The last step, step 5, shows and confirms that unauthenticated access is not allowed.
To see the users configured for this tutorial, view the accompanying kafka_broker_jaas.conf which is utilized in the kafka-authorization-example.yml docker-compose file.
Kafka Authorization Configuration Steps
Ok, next, let’s configure and test some Kafka authorization rules.
For example, let’s create Kafka ACLs to allow Madhu to both produce and consume from a topic, but Alice can only consume from the same topic.
Let’s ensure we understand the before first, because there is a critical setting regarding ACLs that has been skipped over so far.
Let’s have Madhu and Alice both produce some gibberish to the test-topic-auth topic to show they can both publish to it.
~/dev/kafka_2.11-2.4.1/bin/kafka-console-producer.sh --topic test-topic-auth --broker-list localhost:9092 --producer.config ./alice-client.properties
(Remember to Ctrl-C to exit)
~/dev/kafka_2.11-2.4.1/bin/kafka-console-producer.sh --topic test-topic-auth --broker-list localhost:9092 --producer.config ./madhu-client.properties
And now, prove they can both consume from it.
~/dev/kafka_2.11-2.4.1/bin/kafka-console-consumer.sh --topic test-topic-auth --bootstrap-server localhost:9092 --consumer.config ./alice-client.properties --from-beginning
~/dev/kafka_2.11-2.4.1/bin/kafka-console-consumer.sh --topic test-topic-auth --bootstrap-server localhost:9092 --consumer.config ./madhu-client.properties --from-beginning
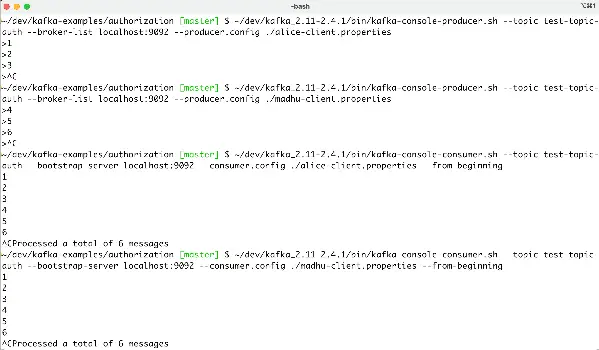
Here is a screenshot of me running through the above commands.
Ok, great, Alice and Madhu can do what they want without restriction.
Applying Kafka Authorization Rules with kafka-acl.sh Examples
Let’s apply our first ACLs.
~/dev/kafka_2.11-2.4.1/bin/kafka-acls.sh --bootstrap-server localhost:9092 --add --allow-principal User:alice --operation Read --allow-host '*' --topic test-topic-auth --command-config ./admin-client.properties
And now the following attempt which succeeded before, will now fail.
~/dev/kafka_2.11-2.4.1/bin/kafka-console-producer.sh --topic test-topic-auth --broker-list localhost:9092 --producer.config ./alice-client.properties
Let’s continue with our desired outcome and set ACLs for Madhu to be able to both produce and consumer from the Kafka topic.
~/dev/kafka_2.11-2.4.1/bin/kafka-acls.sh --bootstrap-server localhost:9092 --add --allow-principal User:madhu --operation Read --operation Write --allow-host '*' --topic test-topic-auth --command-config ./admin-client.properties
Notice how we are passing in two operation variable values in the above command.
Let’s confirm Madhu can still produce to the topic.
~/dev/kafka_2.11-2.4.1/bin/kafka-console-producer.sh --topic test-topic-auth --broker-list localhost:9092 --producer.config ./madhu-client.properties
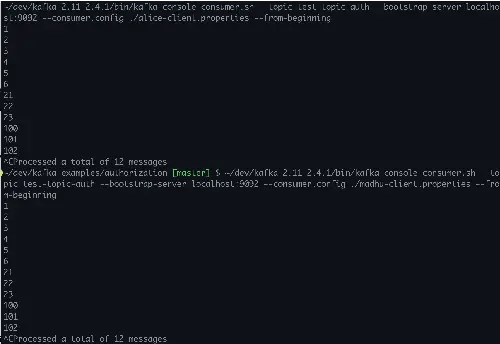
Also, let’s reconfirm they can both still read.
That’s great, we completed our intention to show Madhu being able to read and write and Alice to be able to consume only.
We have an foundation on which we can expand. Before providing more details on available options, we’ve reached the point where we need to dive deeper in the proceeding example configuration.
Kafka ACL Access Control Global Configuration Option
Although the docker compose YAML file used in this example is similar to the compose file used in the preceding Kafka authentication tutorial, there are three key differences.
Open up the kafka-authorization-example.yml file used above and notice:
  KAFKA_AUTHORIZER_CLASS_NAME: kafka.security.authorizer.AclAuthorizer
  KAFKA_SUPER_USERS: "User:admin"
  KAFKA_ALLOW_EVERYONE_IF_NO_ACL_FOUND: "true"
The first two lines are instruct the Kafka cluster to use Kafka ACLs and create a super user. You may have noticed we used the superuser admin in the kafka-acl.sh examples above.
Depending on when you are reading this and the version of Apache Kafka, you may see reference to kafka.security.auth.SimpleAclAuthorizer instead of AclAuthorizer. That’s just older.
Now, it didn’t much matter in the examples above whether we used superuser or not because of the last configuration line above which is setting allow.everyone.if.no.acl.found configuration variable to true.
Why allow.everyone.if.no.acl.found to true?
Setting this to true is not the default. The default is false and implements the security policy of least privilege and should be used in production. For the deeply curious or those that just need to do things themselves to have the best understanding, remove this line and re-run the examples above.
You will notice things such as:
- Both Madhu and Alice not being able to produce or consume until they are explicitly granted authorization through kafka-acls to do so.
- Even after being granted access to Read from the sample topic, they won’t be able to consume. Bonus points for anyone who knows why? Leave your answer in the comments below.
Anyhow, the intention of this post was to provide examples as quickly as possible, so the practice of least privilege was not chosen in the example above.
kafka-acls.sh Examples
The command-line program kafka-acls.sh is used to manage Kafka access control lists (ACLs). It can be used to check permissions for particular users and groups, add, remove, and list ACLs.
Using kafka-acls.sh is as simple as following these steps:
Open a terminal window or command prompt.
Go to the Kafka installation bin/ directory.
Execute the kafka-acls.sh script while providing the necessary inputs for the operation you wish to carry out.
Here are some examples of how to use kafka-acls.sh:
To add a new ACL for a user
kafka-acls.sh --authorizer-properties--bootstrap-server localhost:9092\ --add --allow-principal User:alice --operation Read --topic my-topic
To remove an ACL for a user
kafka-acls.sh --authorizer-properties --bootstrap-server localhost:9092\ --remove --allow-principal User:alice --operation Read --topic my-topic
To list all ACLs for a Kafka topic
kafka-acls.sh --authorizer-properties --bootstrap-server localhost:9092\ --list --topic my-topic
To check if a user has permission to perform an operation on a topic:
kafka-acls.sh --authorizer-properties --bootstrap-server localhost:9092\ --check --allow-principal User:alice --operation Read --topic my-topic
The exact syntax and parameters you need to use will depend on your specific use case and configuration. You can find more information about how to use kafka-acls.sh in the Kafka documentation linked below.
Kafka ACL for Authorization Example Source Code
- Source for all configuration files used in the demo above can be found at https://github.com/supergloo/kafka-examples/tree/master/authorization
- https://kafka.apache.org/documentation/#security_authz_cli
- https://github.com/apache/kafka/blob/trunk/core/src/main/scala/kafka/security/authorizer/AclAuthorizer.scala and notice the code for
allow.everyone.if.no.acl.found
Before you go, I assume you already saw the previous Kafka authentication tutorial? If not and you are new Kafka authentication, check it out.


